
Appearance
Blast Studio
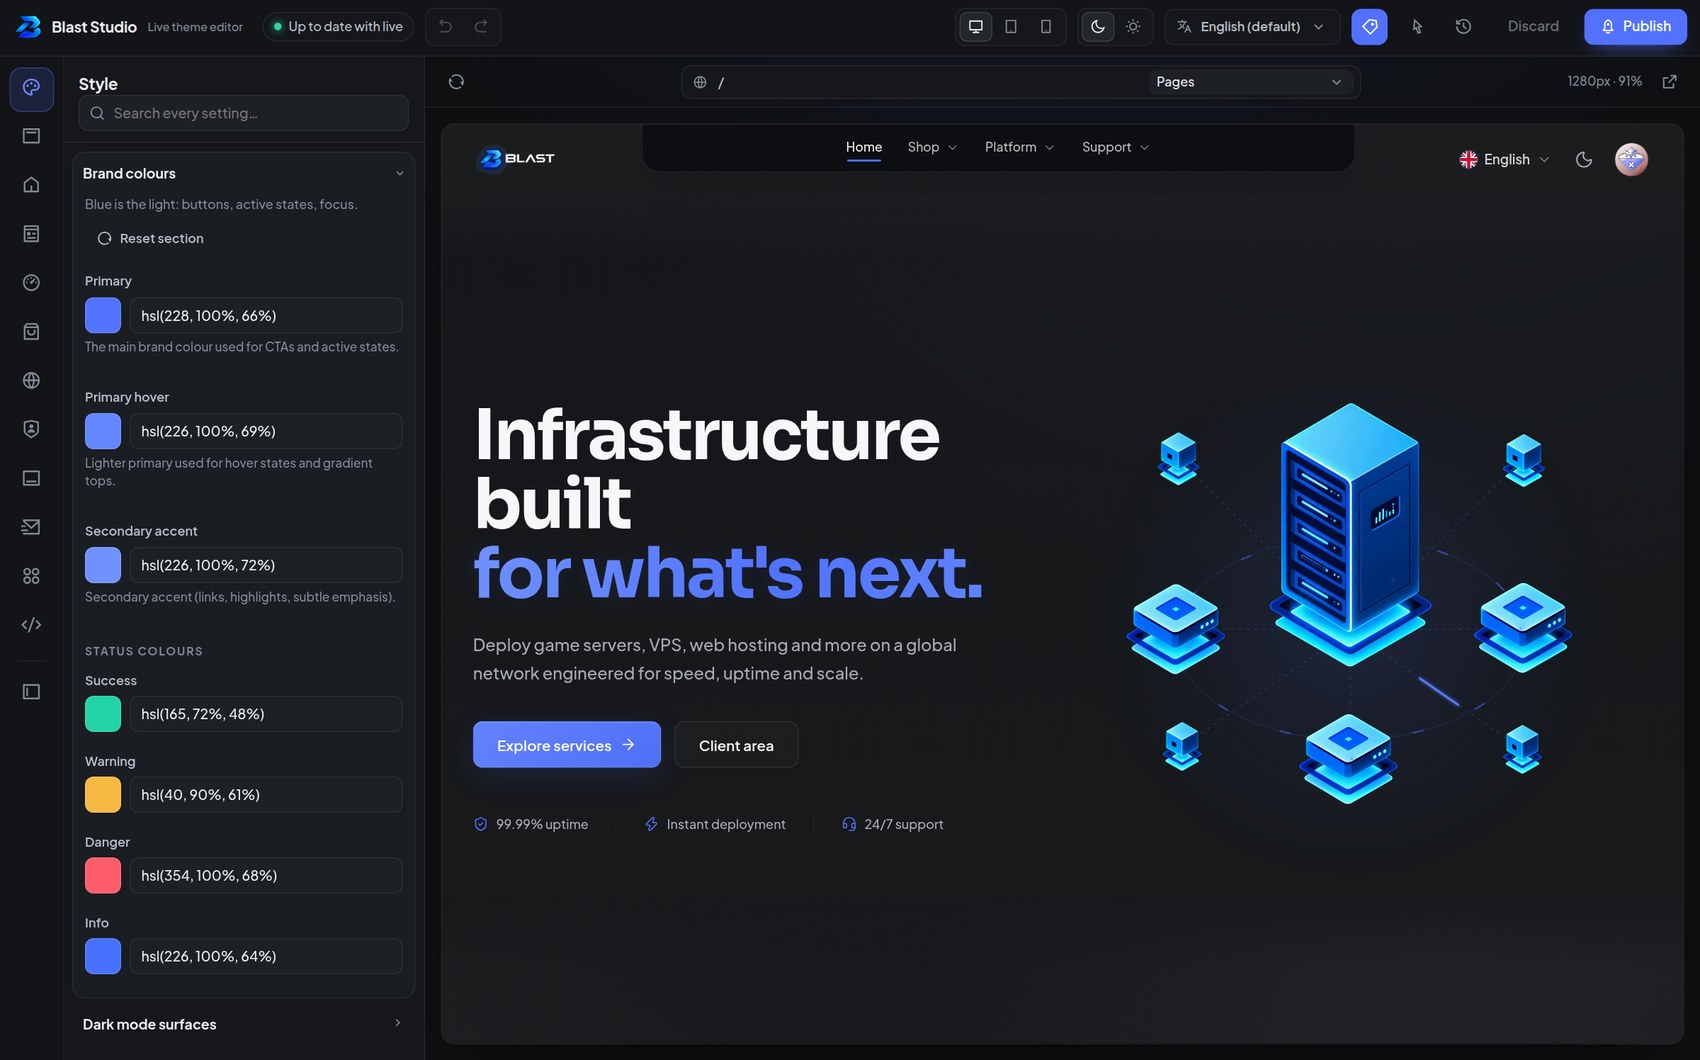
Blast Studio is a full-page editor with a live preview of your real store. You edit on the left and the actual page renders on the right — same data, same products, same pages. Nothing is a mock-up.
Open it from the admin sidebar: Blast Studio.
Draft → publish
Studio never edits your live site directly. Everything you change goes into a draft, and the live site keeps running on the last published version.
| Action | What happens |
|---|---|
| Draft | Your work in progress. Only visible to admins inside Studio |
| Publish | Pushes the draft live, instantly, for everyone, and saves a named revision |
| Discard | Throws the draft away and returns to the published state |
You can preview the draft on your real storefront while you work — the preview frame is your own site rendering the draft for you and nobody else.
You cannot break the live store by experimenting
Nothing a visitor sees changes until you press Publish. If you do not like where you ended up, Discard puts the previous version back.
The toolbar
| Control | What it does |
|---|---|
| Device switcher | Preview as desktop, tablet or mobile |
| Dark / light | Preview either colour mode without changing your settings |
| Language menu | Translate your text and preview the store in that language |
| Tag button (or H) | Toggle hover labels |
| Cursor button (or I) | Click-to-edit mode |
| History | Every published revision, with one-click restore |
| Undo / Redo | Ctrl/⌘ + Z and Ctrl/⌘ + Shift + Z |
| Save | The draft saves itself as you type. Ctrl/⌘ + S saves immediately |
| Publish | Opens the publish dialog, where you name the revision |
Hover labels
With hover labels on (the default), pointing at any part of the preview tells you what it belongs to:
- A blue label names the settings group — for example Homepage › Hero. Clicking it jumps straight to that group in the editor.
- An amber label names a single text field — for example Hero heading. Clicking it opens that field, scrolls to it and puts your cursor in it.
- A small +n on a blue label means the part you are hovering has more related settings groups — click through to see them.
Press H to toggle the labels, or use the tag button in the toolbar.
Click-to-edit
Press I, or click the cursor button, then click any part of the preview. The editor jumps to the settings for that part. It is the fastest answer to "where do I change this?".
Finding a setting
- Search at the top of the panel searches every setting by name, key, description, section and panel.
- A small dot next to a section name means it has unpublished changes.
- Reset section returns one section to its defaults, in the draft only.
- Show in preview scrolls the preview to that section.
- A setting shows a reset icon once it differs from its default.
Publishing and history
Each publish creates a revision. Open History to see the list with the label you gave it, and Restore any earlier revision. Restoring applies to the draft, so you can review it and publish when you are ready — nothing goes live until you say so.
Custom pages, product details and your translations are part of the draft and revisions too. Restoring a revision made before you created your first page keeps your current pages.
If your connection drops, the status chip shows the error and the next change — or Ctrl/⌘ + S — saves again. Nothing is lost.
Export and import
Under Advanced you can export your current draft or the live setup to a file, and import it on another install. Useful for staging → production, or for moving a setup between stores.
Only import Blast files
Import expects a file produced by Studio's own export. Anything else is rejected.
The media library
Image fields open a small media browser with everything you have uploaded, plus an upload button. Uploads are stored under storage/app/public/blast; accepted types and size limits are shown in the browser. Row lists with an image column — galleries, logos, games — and the product gallery use the same browser.
Keyboard shortcuts
| Key | Action |
|---|---|
| H | Toggle hover labels |
| I | Toggle click-to-edit |
| Ctrl/⌘ + S | Save the draft now |
| Ctrl/⌘ + Z | Undo |
| Ctrl/⌘ + Shift + Z | Redo |
| Ctrl/⌘ + K | Focus the settings search |
| Esc | Close dialogs, or leave click-to-edit |
The Ctrl/⌘ shortcuts also work while the preview has focus.
The preview frame
The preview shows the page you are on, not a fixed demo. Use the address bar at the top to move between your storefront, product pages, cart, client area, and the built-in previews for sign-in, error and maintenance pages. Links inside the preview keep you on your own site; external links are blocked on purpose.
If a page looks stuck, press the reload button in the address bar.
A sensible first session
- Style — brand colour, logo, fonts.
- Header & menu — pick a header layout and tidy the menu.
- Homepage — hide sections you do not need, then reorder the rest.
- Store & checkout — choose a category layout and check a real product page.
- Publish, then look at the store on your phone.
Everything in this guide is reachable from the Studio panel; the sections are grouped the same way.